Eleanor Levie HomeAboutEditorial ServicesBooksGallerySpeaker TopicsWorkshopsPast BookingsFree StuffLInks Contact Me

Inspiring Quilting: Elly's blog to boost your creative IQ

Archive for the ‘Quilted Accessories’ Category

Expanding on History

Friday, July 14th, 2017

It’s called a Summer Quilt because it has no batting. Just an appliqued top with a backing; quilting in the ditch to hold the layers together. I bought it for a song many, many years ago, and I’m guessing it’s not quite as old as I am. Circa 1950s or 60s.  I’ve always loved its retro style: Dresden Plate patches include corduroy, flannel, homespun, and wacky prints. Best of all, that on-point setting with stripped lattice is fresh and kicky.


Because it’s so light, it makes a wonderful summer bed-cover. All except for one thing. You guessed it. Old quilts were not made for queen-size beds. So in order to enjoy having my vintage find on the bed, the husband and I are always fighting for covers, pulling the quilt to his side, or mine. And when the bed is made? The effect loudly proclaims: SKIMPY and CHEAP.

But not anymore. I added borders–or rather, panels that break for the bed posters, to the sides and foot of the quilt. Shopped all over for a fabric that would work, and found it in Kaffe Fassett’s Millefiori print, which had all the colors in the Dresden Plate motifs and striped lattice. While contemporary, it felt in keeping with the era and mood and the small scale meant it didn’t fight the vintage piece for attention. I backed this fabric with strips cut from an old mint-green cotton tablecloth, which probably dates back to the same time as the Summer Quilt.

The husband and I sleep well at night now.

Frames of Mind and Matter

Wednesday, August 31st, 2016

Having fun working small. As in, postcard size. And yeah, I’ve backed one with paper, wrote a message, and posted it to our son in Denmark. Postage was $1.33, by the way. Course, it’s been two weeks, and he still hasn’t gotten it…or at least, true to form, hasn’t communicated that he has, nor has he been directly in touch at all (hint hint).

Other postcard-size quilted minis, I’ve set into a shadowbox frame. Amazing how a little postcard is suddenly transformed into a small work of art! How-to’s are easy to understand and cheap—just like me! See them on my website’s Free & Fun link, here.

The two that follow are part of a gallery show, Summer Orbits, in a studio above the Da Vinci Art Alliance in Philly: Galactic Donuts, and Life, Mapped Out.

galactic-donutsDSCN8220

Life,Mapped-Out


DSCN8209

A black and metallic fabric swatch with gingko and character felt Japanese, so I named this piece Asian Pear. It resides alongside many other pears, the subject matter of art I’ve collected by various painters and photographers.  It’s the pear as body shape, natch. Just like me!

AsianPear


DSCN8200

What’s new is Oldham, Todd Oldham

Tuesday, June 14th, 2016

1

All of Everything refers to the many materials, styles and themes that Todd Oldham used to put into his fashion. It is the name of the show, the first major exhibition to focus on the exuberant style and playful aesthetic of Todd Oldham’s runway opus of the 1990s. I just saw it at the Rhode Island School of Design (RISD) Museum; it’s there until Sept. 11.

Some glimpses that us quilters will love…that is, IF you’re into All of Everything, and everything but the kitchen sink in your fashion!

Patchwork

Different types of fabrics and patterns in the coats above and below, and in the mock-up with glued wool that was photographed and used for a print.

DSCN6827


DSCN6821

Patchwork with Woven Ribbons

DSCN6799

Embroidery

DSCN6800

DSCN6802

DSCN6795


DSCN6790

Button Embellishment

DSCN6873

DSCN6874


Beading, Quilting

DSCN6812

Knitting, Lacing, Surface Design, & Beading

DSCN6876


DSCN6809

This last pièce de irresistance was the culmination of a class Oldham taught at RISD in 2014. Except for this collaboration, it has been 14 or 15 years since he’s designed fashion. In the years since, he’s been putting All of Everything into interior design, kid-crafts, and other follies for Target, Old Navy, La-Z-Boy, Escada, movies, and TV. Check out his home here!

13OLDHAM-slide-TAJ3-facebookJumbo

Out of Africa? Wearable Art

Saturday, May 28th, 2016

Stunning fashion at the Philadelphia Museum of Art stirs up passions…and questions. Those who know global fabrics have long recognized that the colorful fabrics long associated with Africa come from Europe, particularly the Netherlands. Which begs for an understanding of colonialism and economic exploitation. In any case, Africans as well as Europeans have embraced the fabrics, combining them in ways wild but wearable, even for large ladies.

safe_image

From its website (http://www.philamuseum.org/exhibitions/845.html):
Vlisco: African Fashion on a Global Stage, April 30, 2016 – January 22, 2017

Explore how the Dutch company Vlisco became one of the most influential textile brands in West and Central African fashion and a design inspiration around the world. Known for its bold and colorful patterns, Vlisco creates fabrics that marry tradition with luxury. This exhibition highlights the company’s classic and new designs, follows the creation of a textile, and showcases a selection of contemporary fashions by African and European makers as well as Vlisco’s in-house design team.
The wax printed textiles associated with Central and West Africa have a surprising history. Although consumers in Africa and the diaspora embrace them as African, the fabrics have long been designed and manufactured in Europe, and now in China and India. The most luxurious are the wax prints designed and made in the Netherlands by Vlisco. Shortly after its founding in 1846, the company began exporting imitation batiks to the Dutch East Indies (Indonesia). Three decades later, Vlisco found a new market in West Africa. This exhibition is offered in conjunction with Creative Africa, a season devoted to African art and design.”
Have a look!

DSCN6588

DSCN6599

DSCN6589

DSCN6590

DSCN6605

DSCN6606


DSCN6594

DSCN6595

DSCN6596

DSCN6597

DSCN6598


DSCN6600

DSCN6601

d1

DSCN6603

DSCN6602

DSCN6604


DSCN6607

DSCN6593

Sumptuous, right? Would you wear any of these wow’ems?


Quilt-scape Album

Friday, January 2nd, 2015

Sad but true: We never print those photos anymore. Whaaaa. We are captives of our electronic world. And a captive audience for anyone who shoves a smart phone in front of us to thumb, er, swipe through a batch of pics. Fight back, quilters! Just as folks enthusiastically welcome your quilted table runners, pillow covers, and tote bags, they’ll love looking at your vacation pics in a handcrafted format, and they’ll be overjoyed to receive their very own brag book with a cover handmade by you. Here’s the how-to lowdown:

1. Get a plastic photo album that holds about the number of 4 x 6 photos you want to include (12, 24, 36). Dollar stores have ’em. For a dollar.

photo-bk

2. Open the photo book out flat and measure across the back cover, spine, and front cover, then measure the length of the spine. Make a little quilt (or quiltlet) 1/2″ larger all around than these dimensions. By my book, 11″ x 7 1/2″ were the final dimensions. OK, woooo, that sounds like a Star Wars commercial, the “final dimensions.” I was inspired to borrow from Karen Eckmeier’s techniques explained in her Accidental Landscapes book (which I was privileged to edit and which you can get from her website) and also in the masterpiece “By the Sea” which Karen contributed to my Skinny Quilts & Table Runners book).  I started using her layered/topstitching method,  pressing edges under and topstitching them to a background— you’ll see that below where the sea meets the sky, for a crisp horizon line, and in the sand of the foreground. Then I threw caution (and patience) to the wind. I abandoned pressing edges under and just tore fabric. The raggedy fringes suggest frothy waves, as do couched ribbons and lace (Karen’s ideas).

1a

3. Pin a looped strand of elastic to the middle of the left side edge. From fabric, cut two rectangles the same size as the little quilt made for the cover. Set one aside for the backing. Cut the other crosswise in half (along the spine). Then fold each crosswise in half again, and place on top of quiltlet so raw edges are aligned at top, bottom, and sides. Pin to hold in place temporarily.

2-better

4. Place the backing on top, with right sides facing. Stitch all around, 1/4″ from edges and leaving a 4″ opening at the center of the bottom.

3

5. Clip corners, and pull the quiltlet through the opening. Use a pin to pick out the corners. Turn the edges of the opening 1/4″ to the inside and stitch them closed. Insert the covers of the photo book into the side pockets.

4a

6. Stitch a button to the front cover to correspond to the loop.

5

7. You might want to knot a length of ribbon to the elastic loop — for decoration, or to wrap around the photo album.

6

Eh voila! Nice, old-fashioned way to capture vacation memories, latest escapades of the grandchildren, or hilarious costumes you forced your pet to wear.

Do leave a comment: what images and techniques would YOU showcase on a photo album cover?


I Kit You Not

Tuesday, October 15th, 2013

ToLrunner-EL

A tug in opposing directions has characterized my quilt publishing career through the years. On one side, I am pulled by the needs of a broad range and huge numbers of quilters who lack the confidence to create their own designs, and so they look for designs they love to reproduce. In books, patterns, and kits, the quilting industry is set up to cater to these folks.

On the other side, I can’t deny a tepid feeling about a copycat quilt, one that’s perfectly faithful to the original. Even when the original is an amazing antique classic that has entered the public domain.

Maybe that’s unfair. After all, when I made the table runner pictured at the top of this post, I certainly started with inspiration: an ancient Sephardit design that originated in Spain or Portugal. The Etz Chayim—Hebrew for Tree of Life—is a symbol for Jews’ most sacred object, the Torah. It also represents family, growth, and strength.

I fully expect folks to start with an existing design–you have to start somewhere! This is exactly why I produced the book Quilt Blocks Go Wild!, which allows you to take a classic block and do something exciting to it, to make it your own. I simplified the tree for a second rendition, offered as a workshop for the Pomegranate Guild of Judaic Needleworkers.

TreeOfLifePillow


For the first time in my teaching career, I was tasked with providing kits to the participants. With a little reluctance, I took orders for a honey, natural, or lavender linen-blend fabric. But I drew the line at including any other specifics, and merely set out stacks of different-color felt for tree trunks and piles of fabric fat quarters and scraps for leaves. I explained to the class my discomfort with straight copying, and my hope that they would each apply their own a personal stamp or different color palette, a unique perspective on the project. Students went well beyond my expectations, and I had the privilege and fun of helping each participant ensure a good contrast, balance, and the injection of her own personality. The resulting quilt tops present a varied grove, a treasure trove of uniqueness. Check out the fabulous, fused appliques below. Kudoes to those who cut an unusual, chunky tree, added a “carved” heart on the trunk, a bird’s nest of eggs, or unusually shaped leaves.

  P1010183 P1010185 P1010186 P1010187 P1010188 P1010189 P1010191 P1010194 P1010197 P1010199 P1010200 P1010201 P1010202

By the way, the how-to’s and the actual-size pattern for the Tree of Life pillow—no kit available! is on my website’s free & fun link; click here for that. But the Pomegranate people let me know they planned to use their designs for wall hangings, tabletoppers, challah covers, and other applications.

What do you think? What’s your take on patterns and kits? What inspires your creativity?

Man Bag

Wednesday, August 14th, 2013


Julian,Sherrs (2)

“Today I am a man.” This is the proclamation given by a 13-year old Jewish boy as he becomes a bar mitzvah–son of the commandment. At one  time, the ripe old age of 13 –12 1/2 for a girl–meant eligibility for marriage. While that’s no longer the case, and while no one throws such a child the car keys or lifts the weekend curfews at this stage, the occasion does herald an elevated status and increased responsibilities. For example, a 13-year-old boy counts towards the minimum number of people required for opening up the sacred book of the Torah. He can be asked to be a pallbearer. He is expected to fast at Yom Kippur, the day of Atonement. In progressive Jewish communities, these are all true for a girl, or bat mitzvah, as well.

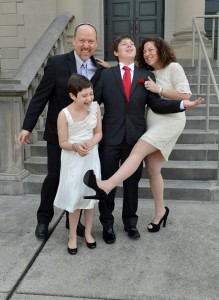
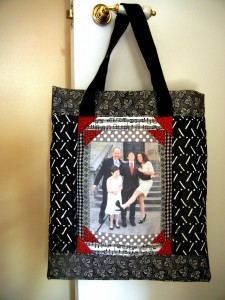
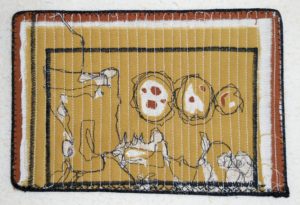
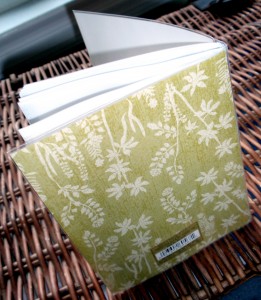
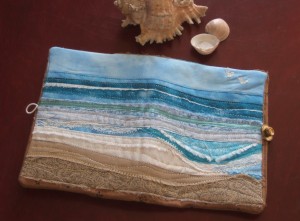
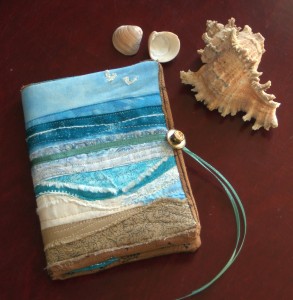
My cousin–twice removed, as we count the generations between us–reached this milestone earlier this summer.  At which time his mother released the most wonderful, exuberant family picture. Which I photo-transferred to fabric, framed with fabric, and made into a bag.

julianbag-materials2 (2)

Such a patchwork treatment is tote-ally appropriate for a man bag… NOT. And I hardly expect my cuz to carry it as he goes about with his pals. Still, his “Today-I-am-a-man-bag” was a good place for me to tuck in a check, and I would hope that it can maybe hang in his room, holding some photos, albums, cards, and other souvenirs of the big day.

julian-done (2)

I’d love to get your comments sharing how you personalize gifts of money, or tote bags. And to see a ton of quick, easy-to-make, and wonderful bags by celebrity quilters, do check out my book, Unforgettable TOTE BAGS. It’s a free giveaway for every single attendee if I’m giving a trunk show or other presentation to your guild in the next year…or while supplies last. Otherwise, it’s almost a giveaway on my website.

For anyone wishing to frame a photo on a bag, I offer these how-to’s, which encompass a bunch of my quilting shortcuts:

1–It’s just a tote bag, not an heirloom.  So yes, you’re supposed to soak fabric in Bubble Jet Set or other product before doing the photo-transferring, in order to prevent the image from fading over time. But again, it’s just a tote bag. You might want to forget about all that prep work.

2–Use a ready-made tote bag as  a lining–you know you’ve got a bunch of  canvas totes with irrelevant logos splashed on them.  Let the dimensions dictate the bag you make. Use a permanent-ink marker on the logo-less back to write a message to the recipient on the bag. Alakazam: combination gift, gift bag, and card!

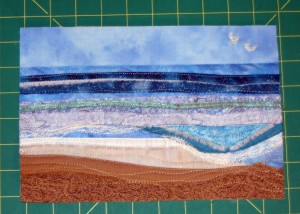
3–Iron the fabric to paper-backed fusible web. This is usually done with freezer paper, but either way, the paper backing stabilizes the fabric so that after you trim it to 8 1/2″ x 11″ it can pass through your printer. Now, it’s a piece of cake to pull off the release paper and fuse the photo-transfer to the center of a rectangle of fabric that’s just 1/2″ larger all around than the tote bag. This background fabric will be used as a foundation; you won’t see it, so it doesn’t matter what it looks like, as long as it doesn’t have a dark graphic that might show through the photo.

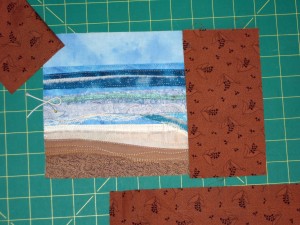
4–Pin coordinating fabric strips to one side of the photo, with right sides together and raw edge of the strip overlapping the edge of the image by 1/2″. Stitch, 1/4″ from the raw edge, then press the strip to the right side. Repeat on the opposite side of the photo, and then on the two remaining sides. This makes a frame, like Log Cabin Courthouse Steps variation.

5–For a Pineapple Log Cabin with the look of photo corners, lay short strips of contrast fabric (here, red) across the corners, with right sides together. Stitch, turn outward, and press.

6–Repeat steps 3 and 4. Add framing strips until the bag is 1″ wider than the tote you’ll use as the lining, plus an additional 3″ at the top.

7–If you want, place the bag front on batting, and quilt as desired. I didn’t.

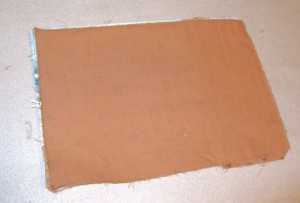
8–Cut a same-size rectangle for the bag back. Place the back and front together with right sides facing, and stitch along the sides and bottom, 1/2″ from the edges. Turn the top edge 1/2″ to the wrong side, and press.

9–Make a boxed bottom: If the tote bag has a bottom, measure how deep it is. With the patchwork exterior still wrong side out, align the bottom and side seams to create a triangle. Stitch the base of the triangle, so that the height of the triangle is equal to the depth of the tote bag bottom–or the depth of the bag you want to create.

box-bottom1 (2)

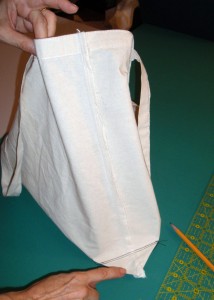
10–Turn the patchwork bag right side out. Cut off the handles of the commercial tote bag, and turn the bag wrong side out. Stuff it into the patchwork bag, aligning the side seams and bottom. Turn the 3″ excess over the rim, pin along the folded edge, and stitch.

11–If you want, stitch down into the bag as far as your machine can, to quilt or at least secure the exterior and lining of the bag. I didn’t bother.

12–Add back those handles. I actually ditched the ones that came with the commercial tote and used two 20″ lengths of black webbing.

13–Stick a check or gift certificate into the bag and mail it to the lucky recipient!  Mazel tov!


At play with mud…mud cloth, that is!

Saturday, August 18th, 2012

Here I am with the hub in Belize–this was taken a couple of years ago. Only photo I could easily locate where I’m carrying my go-to travel tote, an airport purchase, made in China, waterproof, and many-pocketed. But not my own work, and despite the leopard print, eminently forgettable-looking. So NOT worthy of the author of Unforgettable Tote Bags–don’t you think? So I recently went about remedying that.

The process was a cinch, using small pieces of mud cloth.

Bògòlanfini or bogolan (“mud cloth”) is a handmade cotton fabric from Mali, woven in narrow widths and dyed with fermented…you guessed it, mud.  It is a symbol of Malian cultural identity.

Newsflash from Janet Goldner (see below):

Although usually translated as “mud cloth,” bogolan actually refers to a clay slip with a high iron content that produces a black pigment when applied to handspun and handwoven cotton textiles.  Mud is any old bit of earth mixed with water and will not dye the cloth.  Although bogolan is traditionally done on hand woven bands of cotton cloth, the word actually refers to the dye process.”
 Check out this wonderful site from the Smithsonian, called Discovering Mud Cloth. I love the fashions of Chris Seydou on this site, and there’s also a fun little interactive section for making virtual mud cloth–quick and dirty–NOT. Don’t want to actually mess with mud? Do what I did, and buy pieces of mud cloth from  Lisa Shepard Stewart of culturedexpressions.com.  Lisa no longer has the scraps (unless we all “virtually” get down on our knees and plead with her?), but she does carry packets for making mini purses, journal covers, and more on her website.

I removed the tray from my sewing machine, and with the free arm–or shall I say, arm free (like for stitching sleeves and pant legs), I could get the needle into the pockets. It was a simple matter to straight-stitch or zigzag-stitch the edges of the mud cloth to the outsides of the tote’s pockets.  Now, the delicious pattern and texture of the mud cloth tote-ally adds style and uniqueness. A few vintage buttons sealed the deal.


Click here for another fashion foray in mud cloth for you all. And, if you want to visit Mali and see for yourself how mud cloth is made, then you can do no better than to keep in touch with my friend Janet Goldner.  Janet is an amazing artist, sculptor, writer, photographer who frequently visits Mali– sometimes as an art tour guide. Not to mention, well, here I go mentioning—a passionate activist. And an inspirational model for how white chicks like me can get away with dressing African style! That’s the global trend, friends, for the utmost in style and sophistication.  Read the fashion mags, rags, and you’ll see, it’s clear as, well, mud.