Eleanor Levie HomeAboutEditorial ServicesBooksGallerySpeaker TopicsWorkshopsPast BookingsFree StuffLInks Contact Me

Inspiring Quilting: Elly's blog to boost your creative IQ

Archive for the ‘Gift-Making’ Category

The 12 Days of Quiltmas

Thursday, December 17th, 2020

Yes, friends, The 12 Days of Christmas meets The 12 Days of Quiltmas

You undoubtedly know the old English Christmas carol that enumerates each day by the gifts given on each of the twelve days of Christmas.

In London, in 1909, Frederic Austin popularized the arrangement of the song we know today.

In Philadelphia, in December of 2020, Eleanor Levie fiddled with the lyrics for the Village Quilters of Catonsville, MD to perform on Zoom. (Appreciate your sharing — non-commercial use only–with credits for me and Frederic.)

Click Download in the gray oval above to enjoy — and share with your quilting buddies!

Topsy-Turvy

Tuesday, March 13th, 2018

Do you remember topsy-turvy dolls? A bit like a Pushmepullyou from the story of Dr. Dolittle.

Do little, however, is rarely my modus operandi…quite the opposite, I tend to go overboard. So when–a long time ago, I took a class from one of the top dollmakers in the world, Elinor Peace Bailey, I didn’t make a doll from one of her kits. I didn’t make a doll…I made a topsy turvy doll. Here’s the basic body:

Here’s the Sun’s sun-dress, made today from a pillowcase that my grandmother had, and the Moon’s nightshirt:


Takes me back to my girlhood. I never played with dolls, but I made dolls and made costumes for them.

Always nice to have a reason to finish a project. This topsy turvy doll is headed–pun intended–to a baby who is the sun, moon, and stars to her family. Only hope the dog doesn’t chew it up before she can enjoy it!


Cut-Ups for Quilt-Art

Monday, August 22nd, 2016

Here’s one piece of fabric from the painting play-date I described last month:

DSCN7806


I hated the result. But that doesn’t mean certain areas didn’t have potential. I cut up sections I liked, and fused them to Peltex–thick interfacing. The kind I had featured fusible on both sides, but I only adhered to one side, protecting my ironing surface from the other side with a Teflon pressing sheet.

Then, I mined for gold: went through my scrap stash of mostly silks and silky fabrics for collage candidates in warm colors and light, medium, and dark accents. When I found a piece that played well with my painted background, I pressed fusible web to the back, and without measuring, I scissors-cut strips and rectangles. Auditioned some arrangements. Fused the scraps in place. Quilted to make the compositions more cohesive. Couched cord or chenille yarn around the edges for a finish.

Center-of-Gravity

               Center of Gravity, 13″x 7″

galactic-donuts

Galactic Donuts, 6″x 4″

Those painted backgrounds are pretty well covered up, I confess. Can you find the areas of the painted fabric at the top that I used for each piece?

Quilt-scape Album

Friday, January 2nd, 2015

Sad but true: We never print those photos anymore. Whaaaa. We are captives of our electronic world. And a captive audience for anyone who shoves a smart phone in front of us to thumb, er, swipe through a batch of pics. Fight back, quilters! Just as folks enthusiastically welcome your quilted table runners, pillow covers, and tote bags, they’ll love looking at your vacation pics in a handcrafted format, and they’ll be overjoyed to receive their very own brag book with a cover handmade by you. Here’s the how-to lowdown:

1. Get a plastic photo album that holds about the number of 4 x 6 photos you want to include (12, 24, 36). Dollar stores have ’em. For a dollar.

photo-bk

2. Open the photo book out flat and measure across the back cover, spine, and front cover, then measure the length of the spine. Make a little quilt (or quiltlet) 1/2″ larger all around than these dimensions. By my book, 11″ x 7 1/2″ were the final dimensions. OK, woooo, that sounds like a Star Wars commercial, the “final dimensions.” I was inspired to borrow from Karen Eckmeier’s techniques explained in her Accidental Landscapes book (which I was privileged to edit and which you can get from her website) and also in the masterpiece “By the Sea” which Karen contributed to my Skinny Quilts & Table Runners book).  I started using her layered/topstitching method,  pressing edges under and topstitching them to a background— you’ll see that below where the sea meets the sky, for a crisp horizon line, and in the sand of the foreground. Then I threw caution (and patience) to the wind. I abandoned pressing edges under and just tore fabric. The raggedy fringes suggest frothy waves, as do couched ribbons and lace (Karen’s ideas).

1a

3. Pin a looped strand of elastic to the middle of the left side edge. From fabric, cut two rectangles the same size as the little quilt made for the cover. Set one aside for the backing. Cut the other crosswise in half (along the spine). Then fold each crosswise in half again, and place on top of quiltlet so raw edges are aligned at top, bottom, and sides. Pin to hold in place temporarily.

2-better

4. Place the backing on top, with right sides facing. Stitch all around, 1/4″ from edges and leaving a 4″ opening at the center of the bottom.

3

5. Clip corners, and pull the quiltlet through the opening. Use a pin to pick out the corners. Turn the edges of the opening 1/4″ to the inside and stitch them closed. Insert the covers of the photo book into the side pockets.

4a

6. Stitch a button to the front cover to correspond to the loop.

5

7. You might want to knot a length of ribbon to the elastic loop — for decoration, or to wrap around the photo album.

6

Eh voila! Nice, old-fashioned way to capture vacation memories, latest escapades of the grandchildren, or hilarious costumes you forced your pet to wear.

Do leave a comment: what images and techniques would YOU showcase on a photo album cover?


Ode to 2015

Friday, January 2nd, 2015

PuertoRicoAlbum

It’s here: the year MMXV
Ushered in with jubilee
Ball drops and fireworks on our screens
To welcome in two-oh-fifteen.

The hub and I had a vaca Caribbean
Enjoyed adventures near-amphibian
Took warmth from sun and sand and sea
Unapologetically.

Spending, tipping, napping, touring
Eating, drinking, smorgasbording
You’re on vacation, just indulge!
Never mind the tummy bulge!

Never mind expense and guilt!
The unsent cards, the un-made quilt.
Now back to productivity
To Mac/PC captivity.

Back on the wheel, one of the cogs.
New lesson plans, new posts for blogs.
News and views, make ’em halfway clever!
Offers to guilds for gigs wherever!

Back to eating healthily,
Chemical pesticide- and hormone-free.
Neither vegan, heathen nor yokel be!
(Though nothing’s fresh now locally.)

Back to winter chill and freeze
Nowhere outside reached with ease.
Forced marches grimly to the gym,
Feign that claim to vigor and vim!

Oh woe is me, my vaca’s over.
There’s bills to pay and I’m cold stone sober.
I’ve muscles that ache, and rashes that itch.
…Can you believe I’m such a bitch?

I’m fortunate as all get-out!
Got NO excuse to rant or shout!
My life ain’t perfect, but my deal’s hardly raw,
One can’t avoid hassles or prevent Murphy’s law.

Any Crazy Quilters still following this thread?
Then I wish you a bright patchwork year ahead.
No Spider’s Den, no Rocky Road,
No need to have stitches ripped out or re-sewed.

May you grow the techniques in your repertoires.
No whine, all Roses, all Pinwheels and Stars,
May your Shadows be brightened by lots of Sunshine,
And may your aggravations be as minor as mine.

All the best for 2015!

Opposing Forces = Art

Wednesday, July 30th, 2014

Looking for a zen-like, meditative haven? How about an intense and heady tour of some of the most riveting and revolutionary sculpture ever created? I found both experiences at the Isamu Noguchi Museum in Queens, NY.  You will, too.

P1012672

Isamu Noguchi (1904–1988) was one of the twentieth century’s most important and critically acclaimed sculptors.

I am struck by all the opposing forces in his life, which found expression in his work:

  • His mother was a Scottish-American writer; his father was a Japanese poet.
  • Noguchi spent most of his life and had studios in both Japan and New York.
  • That East-West tug on his identity made him fully comfortable in neither place.
  • He was inspired by the lyricism of nature, and the boldness of Brancusi’s reductive, powerful forms.
  •  Noguchi created huge stone monoliths and delicate paper lampshades, mass-produced furniture and fine art, public gardens and theatrical set designs.
  • He said,”The best is that which is most spontaneous or seemingly so.” He also said, “Brancusi made me realize that what I had learned previously – the quick ways of doing things – was all wrong. It is a search you have to enter – into yourself.”

P1012673

P1012661

P1012663


P1012665


P1012668


In my art-making, I am constantly struggling with opposites:

  • I want to produce work that is both subtle and bold.
  • I covet simplicity but I want to convey complex ideas.
  • I strive for the sophistication of abstraction but always seem to end up with pictures–still life, landscape, recognizable figures.
  • I admire the purposefulness of working in a series, yet I flit — from one sort of style, group of materials, and type of end product to another.
  • I know I should put in the time, but I am, at heart, a quick-and-dirty worker.
  • I seek popular success for my books and patterns and presentations and workshops, but I think it’d be awesome to be accepted into the lofty echelons of the serious fiber art world.

My sewing room, aka my studio, reflects the dualities. I have two sets of projects calling to me:

Baby banners, pillows, and Skinny quilts/table runners for gifting and patterning for my recently launched EllyLdesign line on Craftsy and Etsy (another dichotomy, as I haven’t committed to just one quite yet).

trio (2)

DSCN2988

Ruler1


Psst–You can check out my Craftsy Shop or my Etsy Shop.  I’m proud to say that the instructions are 100% reliable and user-friendly and full of how-to photos –just like my books. Let me know, in the comment box below, what you think!


OK, the commercial message is over, so let me switch over to the other side of my brain. That is focused on the constantly evolving arrangements on my design wall.  Here are a few of the iterations. Once again, I welcome your comments: Which one appeals most? 1, 2, 3, 4, 5, or 6?

4

1

7a

2


3

3


4

4


5

5


6

6


I definitely dig Noguchi’s aesthetic. He was lucky to have good critics and great supporters — he hung out with Arshile Gorky, Willem de Kooning, and a lot of other abstract expressionists. He found ways to nourish and bridge the different aspects of his identity and to address many different interests, putting the tensions of opposing forces to work in his favor. 

Me, I often feel like Dr. DooLittle’s pushmi-pullyu, that crazy, two-headed unicorn gazelle, trying to go in two opposing directions. Still, I’ll get there, wherever there is, somehow, sometime! Thank YOU for the criticism and the support. Heck, thanks for reading this!


Gifting Personalized Miniatures

Saturday, December 21st, 2013

I have a passion for little things in life. Dollhouses, tiny dolls, miniature villages and train displays, demitasse cups, bonsai, newborn babies—who isn’t captivated by these wee charmers?

mini-fini 2 (2)

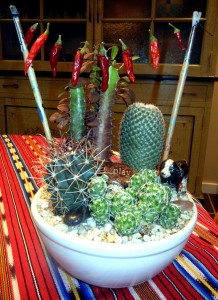
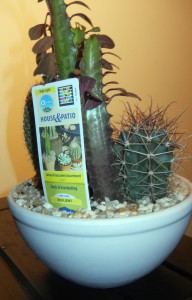
For personalized gifting: my mini cactus garden

Those were the words that introduced my book,  Marvelous Miniatures, part of the Rodale’s Successful Quilting Library Series. And years before that my first book ever came out: Great Little Quilts: 45 Antique and Doll-size Quilts with patterns and Directions (Harry N. Abrams). Another book I authored is Creations in Miniature: 101 Tiny Treasures to Stitch & Craft (published by Krause). See a little trend here?

Yup, I love quilting and crafting miniatures…especially when they are quick. As gifts, they can be very personal. And no risk: unlike a big quilt, they can be displayed anywhere at all.

Here are three gift minis that arose out of creative playtime. The first one is quite recent:


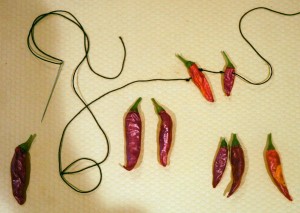
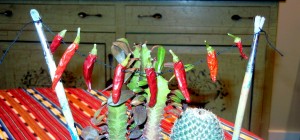
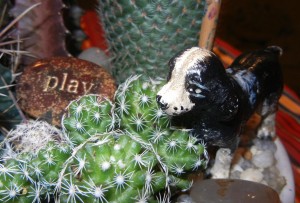
1. Mini Cactus Garden

This year’s Christmas gift for dear friends who travel and therefore cannot water houseplants regularly and who adore their springer spaniel.

Materials:

Cactus pot from my local Lowes, tiny jalapeno peppers, black heavyweight thread, two old paintbrushes, iron vintage look dog figurine, engraved and plain polished stones.

How-To Tips:

Thread peppers onto black thread, making knots to keep them separated. Tie ends onto paintbrushes and insert into pot. Set figurine and stones in pot.

cactus (2)    pepper-stringing (2)

peppers,strung2 (2)

mini-fini -detail2 (2)


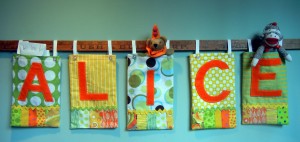
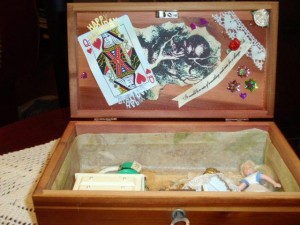
2. Alice-in-Wonderland Treasure Chest

For a wonderful, witty, and fabulous BFF, a Lewis Carroll fanatic and a high-powered NGO advocacy leader in Washington DC, who lives an adventure filled with comic characters, changing scenes, and strategic challenges.

Materials:

Small wood chest/jewelry box, photocopies of illustrations from Alice Through the Looking Glass, vintage-look tissue paper, decoupage medium, mini, 3-legged “table” to keep a box lid off a pizza, green leprechaun’s hat from a St. Patrick’s Day cupcake, a playing card, plastic miniatures–dresser with mirror, perfume bottles, Alice doll,  playing card, Happy Birthday confetti, bits of lace, ribbons, ribbon rose, watch works, stickers, glue dots and hot glue.

Alice-1

alice-3 (2)


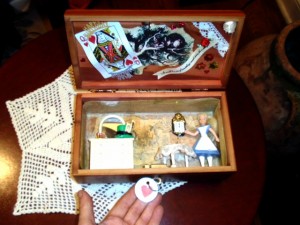
Note: That special Lewis Carroll quote I printed must surely resonate for my friend, and for all of us:

“It would be so nice if something made sense for a change…”

How-To Tips:

Different adhesives performed different jobs in this assemblage. Brushing decoupage medium under and over photocopied illustrations–torn or cut–and tissue paper, I decorated the insides of the lid and box. Using tweezers to keep fingers from getting burned, I hot-glued the heavier playing card, plastic figurine and other assorted items in place. Glue dots came in handy for the tiniest items, and stickers stuck as expected.


alice-4 (2)

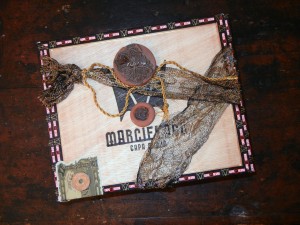
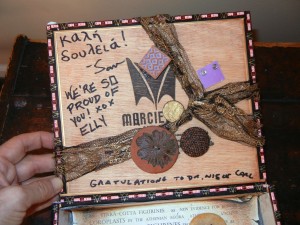
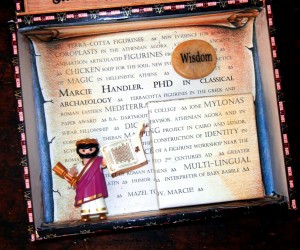
3. Box in a Box in a Box

This gift was inspired by a niece who’d just received her PhD in archaeology. After wrapping a piece of jewelry by a local artist in a small box, I incorporated the gift box into a larger, personalized scene. Invited the hubby and son to add their congrats, then packed it off, well-padded, in a slightly larger box.

Materials:

A cigar box (chosen as my niece’s name is part of the brand name), text pertinent to Marcie’s dissertation, which concerned pottery in ancient Greece, typed and printed out on old, scroll-look paper, hand-made ceramic buttons, ribbons and twine, currency, an engraved stone, and a Playmobil figure with relevant accessories.

How-To Tips:

As described above with number 2, various adhesives did the necessary securing of objects. The little gift box, wrapped in the same text document as the background, was too camouflaged to be seen. That’s why I had to direct attention to it, with a little OPEN ME post-it.

Marcie-PhD-box 1 (2)

   Marcie-PhD-box 4

Marcie-PhD-box 3 (2)

Marcie-PhD-box 2 (2)


Last-Minute Friendly?  Not so much!

Stay on the lookout all year long for inexpensive little items that speak to a loved one’s interests. Neighborhood tag sales and garage sales nearly always include minis, from Happy Meals to games with only some of the playing pieces. Buy polished rocks with a little saying at museum shops and gift stores.  Whether you send handmade gifts,–whether it’s quilty or crafty, or just participate in the packaging and wrapping of gifts…it’s an impressive show of love. Keep it fast and fun. And make it  personal. Such touches make these gifts that will be kept and cherished!

Please leave a comment before the year ends, telling me what you pursue in the miniature creative realm. I’ll award a copy of my book, Creations in Miniature, to each of three lucky mini-lovers! Be sure to subscribe, and you’ll get wind of new postings—approximately two per month.

Hope your holidays are hugely enjoyable, and may all your problems be miniature ones!


Man Bag

Wednesday, August 14th, 2013


Julian,Sherrs (2)

“Today I am a man.” This is the proclamation given by a 13-year old Jewish boy as he becomes a bar mitzvah–son of the commandment. At one  time, the ripe old age of 13 –12 1/2 for a girl–meant eligibility for marriage. While that’s no longer the case, and while no one throws such a child the car keys or lifts the weekend curfews at this stage, the occasion does herald an elevated status and increased responsibilities. For example, a 13-year-old boy counts towards the minimum number of people required for opening up the sacred book of the Torah. He can be asked to be a pallbearer. He is expected to fast at Yom Kippur, the day of Atonement. In progressive Jewish communities, these are all true for a girl, or bat mitzvah, as well.

My cousin–twice removed, as we count the generations between us–reached this milestone earlier this summer.  At which time his mother released the most wonderful, exuberant family picture. Which I photo-transferred to fabric, framed with fabric, and made into a bag.

julianbag-materials2 (2)

Such a patchwork treatment is tote-ally appropriate for a man bag… NOT. And I hardly expect my cuz to carry it as he goes about with his pals. Still, his “Today-I-am-a-man-bag” was a good place for me to tuck in a check, and I would hope that it can maybe hang in his room, holding some photos, albums, cards, and other souvenirs of the big day.

julian-done (2)

I’d love to get your comments sharing how you personalize gifts of money, or tote bags. And to see a ton of quick, easy-to-make, and wonderful bags by celebrity quilters, do check out my book, Unforgettable TOTE BAGS. It’s a free giveaway for every single attendee if I’m giving a trunk show or other presentation to your guild in the next year…or while supplies last. Otherwise, it’s almost a giveaway on my website.

For anyone wishing to frame a photo on a bag, I offer these how-to’s, which encompass a bunch of my quilting shortcuts:

1–It’s just a tote bag, not an heirloom.  So yes, you’re supposed to soak fabric in Bubble Jet Set or other product before doing the photo-transferring, in order to prevent the image from fading over time. But again, it’s just a tote bag. You might want to forget about all that prep work.

2–Use a ready-made tote bag as  a lining–you know you’ve got a bunch of  canvas totes with irrelevant logos splashed on them.  Let the dimensions dictate the bag you make. Use a permanent-ink marker on the logo-less back to write a message to the recipient on the bag. Alakazam: combination gift, gift bag, and card!

3–Iron the fabric to paper-backed fusible web. This is usually done with freezer paper, but either way, the paper backing stabilizes the fabric so that after you trim it to 8 1/2″ x 11″ it can pass through your printer. Now, it’s a piece of cake to pull off the release paper and fuse the photo-transfer to the center of a rectangle of fabric that’s just 1/2″ larger all around than the tote bag. This background fabric will be used as a foundation; you won’t see it, so it doesn’t matter what it looks like, as long as it doesn’t have a dark graphic that might show through the photo.

4–Pin coordinating fabric strips to one side of the photo, with right sides together and raw edge of the strip overlapping the edge of the image by 1/2″. Stitch, 1/4″ from the raw edge, then press the strip to the right side. Repeat on the opposite side of the photo, and then on the two remaining sides. This makes a frame, like Log Cabin Courthouse Steps variation.

5–For a Pineapple Log Cabin with the look of photo corners, lay short strips of contrast fabric (here, red) across the corners, with right sides together. Stitch, turn outward, and press.

6–Repeat steps 3 and 4. Add framing strips until the bag is 1″ wider than the tote you’ll use as the lining, plus an additional 3″ at the top.

7–If you want, place the bag front on batting, and quilt as desired. I didn’t.

8–Cut a same-size rectangle for the bag back. Place the back and front together with right sides facing, and stitch along the sides and bottom, 1/2″ from the edges. Turn the top edge 1/2″ to the wrong side, and press.

9–Make a boxed bottom: If the tote bag has a bottom, measure how deep it is. With the patchwork exterior still wrong side out, align the bottom and side seams to create a triangle. Stitch the base of the triangle, so that the height of the triangle is equal to the depth of the tote bag bottom–or the depth of the bag you want to create.

box-bottom1 (2)

10–Turn the patchwork bag right side out. Cut off the handles of the commercial tote bag, and turn the bag wrong side out. Stuff it into the patchwork bag, aligning the side seams and bottom. Turn the 3″ excess over the rim, pin along the folded edge, and stitch.

11–If you want, stitch down into the bag as far as your machine can, to quilt or at least secure the exterior and lining of the bag. I didn’t bother.

12–Add back those handles. I actually ditched the ones that came with the commercial tote and used two 20″ lengths of black webbing.

13–Stick a check or gift certificate into the bag and mail it to the lucky recipient!  Mazel tov!